Best IDE Configuration Practices for Checkmk Plug-in Development

Hi all!

During the call on DevAPI migration we had several comments and questions about the best IDE tool and the best practices for configuring one to be the most efficient with Checkmk plug-in development.

I believe the two favourites were PyCharm and VSCode.
Some people had great ideas on how to set it up so that the development of plug-ins could become easier.

Let’s share best practices together!

:slight_smile:

4 Likes

Then i will start with my dev environment.
I use a modified template from @Jiuka together with VSCode and Docker containers.
As our company devices are Windows, i have setup my WSL2 Linux and inside this Linux i have a clone of the Github repo.

  • start WSL session
  • go to dev folder with the cloned repo
  • code . (to start VSCode inside the dev environment)
  • the question if you want to start VSCode inside the container you answer with yes
  • CMK is running and ready for development

You can use the debugging features of VSCode if you define some debugging actions.
It is a very nice and quick build. Setup for a new CMK version only take around 1 to 2 minutes.

Original Dev Environment from @Jiuka GitHub - jiuka/checkmk_template: Template for new Checkmk Extensions
My modified version GitHub - Yogibaer75/checkmk_template at cmk23
The biggest difference is that i use the GUI to build and maintain packages.

7 Likes

Hello Andreas,
thank you very much for your instructions!
Container is running in the WSL and Vscode shows me the folders accordingly. So far so good :wink:

Now comes the newbie questions:

  • How do I access the GUI of the CheckMK container from my Windows? I have obtained the IP with docker inspect <container_id>, but it can only be reached by pinging from the WSL, not from Windows. I should be able to get to the container from my Windows through the WSL!?
    Got it: http://localhost:5000
  • The folder structure in your repo is not yet mapped according to the new API in “local/lib/python3/cmk_addons/plugins/YOUR_PLUGIN_FAMILY_NAME/”, is it?
    git checkout cmk23 and then start code . solved it :see_no_evil:

This question is directed both at your setup and in general. Maybe there are other (simpler) possibilities? @moritz also used this yesterday in the dev call:

  • How can I use intellisense from vscode for the imported CheckMK modules?
    For example, I create a ruleset and when I enter “topic = Topic.” I would like to get suggestions such as APPLICATIONS, NETWORK etc.

At the moment the modules are marked as unknown/warning:

Thanks in advance!
Kind regards, Marc

I don’t know if that solves your problem but here’s what I do on my Ubuntu machine:

I have a git repository with my plugin code in my $HOME and a checkmk 2.3 site on the very same machine.

In my working directory I created a file .env with the output of

echo "PYTHONPATH=$(python3 -c "import sys; print(':'.join(sys.path))")"

Run that echo command as the site user. It will output something like

PYTHONPATH=/omd/sites/mysite/local/lib/python3:/omd/sites/mysite/lib/python3/cloud:...

These are the paths that the site specific python3 uses.

Put that output in the .env file in your vscode workspace directory.

VSCode will pickup that file and in addition to the usual python search paths it will search in the directories given in that .env file. See here for the documentation: Using Python Environments in Visual Studio Code

This way vscode finds the definition of, say, from cmk.agent_based.v2 import SNMPTree.

I am really not an expert on the topic, but I also need a solution.

I think it also depends in what area you are going to change/add code.
Just plugin development in ~/local or do you also want to change the shipped checkmk code?

If you really want to alter the checkmk code in /opt/omd/versions/<version> you need to have root permissions to modify/add/delete files there.

I know that some developers are checking out the checkmk git repo, create their feature branch, use any editor they like and have a hotkey, that copies the modified file from the git repo into/opt/omd/versions/<version> using sudo, to test the code (and even reload the site apache if needed)

But most of us will probably only need to modify files below ~/local for check plugins, agent plugins, metric definitions, RuleSpecs, FormSpecs and whatever.

For this I think it’s a very good approach to have your code on your workstation in a git repo and map this folder it into a checkmk container or VM so that it is available in the container/VM in or below /opt/omd/sites/<mysite>/local/

You can then use your workstation enviroment, favorite editor, all the tools you like without the need to install anything into that site or VM or container.
But I am not sure if in this case the IDE running in the enviroment of your workstation can make use of the python interpreter of the site and it’s libraries like ~/lib/python3/cmk

But to make any IDE aware of the available classes, functions, methods etc and even the included document it has to be aware of the sites python environment.

During the Plugin developent workshop on last Conference, I learned this solution to use VSC as IDE:

  • you have a checkmk site for development running somewhere (on your laptop, vm, container, anything)
  • you then make sure that you can passwordless ssh to that site with pubkey authentication (put your pubkey into the site users .ssh/authorized_keys)
  • Install visual-studio-code VSC (run it with just “code”)
  • In VSC install the extension “Remote - SSH” and “Remote Explorer”. Also install python language support.
  • I do not remember the exact steps and details but this is what I now have installed:

On the left sidebar the lowest icon now gives you a “Remote Explorer” and it is possible to create ssh connections. I created e.g. one for localhost to my site workshop_conf10.

On the first ssh connect by VSC some stuff is installed in the site.
My understanding is that in the checkmk site there is a kind of remote VSC server running, communication with the VSC IDE on my workstation via ssh.

:information_source: However, the final most important thing is now to tell VSC to use the correct python interpreter which is the one from the site.
This is done by clicking in the lower right area as shown here:

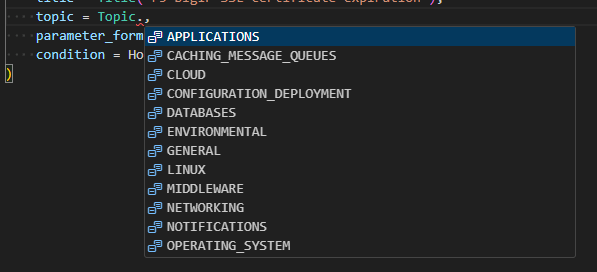
And from then on I am able to edit the code and already get all kind of auto completion and auto suggestions.
This was mind blowing for me.

BTW with the codium fork of VSC code it was not possible to use the remote ssh and remote explorer extensions. Mounting the sites ~/local folder than could be done by sshfs instead.

So far so good but somehow VSCode and me do not play well together.

I am an OPS guy and prefer to live hack as site user (in production :wink: ) and I am planning to do this with neovim, with one of the ready-to-use nice python IDE configurations that can be found on gitbub.

LazyVim is on of them https://www.lazyvim.org/ but I am going to make an extra post for that.
Just a recent nvim (neovim) an this is needed, and you already get a nice IDE:

git clone https://github.com/LazyVim/starter ~/.config/nvim
2 Likes

That was the necessary hint! I’m sure I had changed the interpreter before, but apparently not the right one.
Now intellisense works as desired:
grafik

I login via SSH with X forwarding as site user to my dev site. This allows me to start remote X programs.

I have now installed vscode on the machine. After starting it as site user I do not get the hints. VScode uses the Python interpreter from ~/bin/python as site user.

It looks like the imports and therfor the hints only work for API v2 check plugins.

I am trying to get setup using this, Yogibaer75 modified, version - many thanks for sharing this. I can start the devcontainer, add a host to checkmk and get an (existing) plugin to appear in checkmk.

What I’m struggling to get working is the Python debugger. I can use the cmk - check debug configuration, which correctly runs the cmk command. I can see some sample print ("DEBUG ...") that I added appear in the terminal, but the debugger never hits any breakpoints.

OMD[cmk]:/workspaces/checkmk_template$ cd /workspaces/checkmk_template ; /usr/bin/env /omd/sites/cmk/bin/python3 /opt/omd/sites/cmk/.vscode-server/extensions/ms-python.debugpy-2024.12.0/bundled/libs/debugpy/adapter/…/…/debugpy/launcher 60105 – ~/bin/cmk -vv --debug -n srx
value store: synchronizing
Trying to acquire lock on /omd/sites/cmk/tmp/check_mk/counters/srx
<snip>
Received no piggyback data
DEBUG Parse
DEBUG Check
DEBUG END TEST
<snip>

If I use the debug configuration Python: Aktuelle Datei on the check file itself, then a breakpoint set on e.g. the SNMPSection does trigger. Obviously nothing else happens, but it confirmed that the debugger can work.

Any thoughts on why the debugger doesn’t work for the actual check (or discover, or rediscover)?

The debug problem is a little bit difficult i know :wink:
The breakpoint needs to be set inside the real path in the container.

Here an small example from my Redfish package.
I want to set a breakpoint inside the “redfish_processors.py” file.


The problem here is VSCode sees this file with the path.

This will not work as this file is not called any time if i do a “cmk --debug -vvn HOSTNAME”.

Solution.
Inside your integrated terminal


Inside this file you can set the breakpoint and it will be respected if you execute now the debugger.

result

I know it is a little bit strange but i don’t know a better solution at the moment.

In the end it has to do with the mounted workspace folders to inside the container.

2 Likes

Thank you so much :slight_smile: This now works.

You run code-insiders <filename> as you’re using the Visual Studio Code Insiders release. For anyone else who comes across this, if you’re using the regular (non-insider) release then you just run code <filename>.

Cheers,

1 Like

TL/DR: Look towards the bottom for the streamlined version of my process to set this up

Putting my experience out here since I had to spend a couple hours messing around to figure this out. Hopefully it will save someone else time and energy. First will be my meandering process. After, I’ll streamline it so it only includes what I think are necessary steps.

First, here’s my wandering path:
-Already have a WSL Ubuntu installed and working. I use it heavily for my job
-Installed Docker desktop for Windows
-Install the Remote Container plugin
    -Make sure to follow the extra step listed in the installation steps for Docker for Windows to confirm WSL connection. I had to change the Docker Desktop settings to enable it to connect to my WSL instance.
-Followed the tutorial Get started with development Containers in Visual Studio Code to make sure my VS Code and plugin were working
-Started a CheckMK Cloud site directly in Docker Desktop
-Verified UI access
-Cloned the Yogibaer75 git repo to my local WSL system
-Entered the repo’s tree and tried to enter code . within my normal terminal, not within VS Code terminal: failed “Command 'code' not found, but can be installed with snap install code
-Spend an hour re-reading everything several times over trying to see where I went wrong
-Finally have the realization that you can connect the terminal pane in VSC to the WSL terminal
-Do that, cd into the repo tree, run code . within the VSC terminal
-Container starts up
-Find it is using 2.1.0p42 free (deprecated edition). Check the DockerFile to see the build process. The version argument called out in the DockerFile is not shown to be used in any of the documentation
-Tear down the container
-Edit the DockerFile to have an explicit definition of 2.3.0p19 cloud
-Rerun code . with the new hardcoded DockerFile (not best practice, I know)
-Worked. Tear it down to figure out the best practice for starting up a container with a version specified at container invocation time
-Fail initial attempts. Research DockerFile ARG syntax to no avail
-Compare the two different repos versions of DockerFile and find that the Yogibaer75 one does not specify the version like Jiuka’s does
-Discover that in Yogibaer75’s, the version is specified in the devcontainer.json file
-Restore Yogibaer75
-Edit .devcontainer/DockerFile and .devcontainer/devcontainer.json. See diff:

diff --git a/.devcontainer/Dockerfile b/.devcontainer/Dockerfile
index 13f56b1..9085856 100644
--- a/.devcontainer/Dockerfile
+++ b/.devcontainer/Dockerfile
@@ -1,5 +1,6 @@
+ARG EDITION
 ARG VARIANT
-FROM checkmk/check-mk-free:${VARIANT}
+FROM checkmk/check-mk-${EDITION}:${VARIANT}

 RUN /docker-entrypoint.sh /bin/true

diff --git a/.devcontainer/devcontainer.json b/.devcontainer/devcontainer.json
index bd2fc68..801c1e5 100644
--- a/.devcontainer/devcontainer.json
+++ b/.devcontainer/devcontainer.json
@@ -4,7 +4,7 @@
	 "name": "Checkmk",
	 "build": {
		 "dockerfile": "Dockerfile",
-        "args": { "VARIANT": "2.1.0p42" }
+        "args": { "VARIANT": "2.3.0p19", "EDITION": "cloud" }
	 },

	 "customizations": {

-Get my desired edition and version when running code . within my cloned Yogibaer75 repo
-Struggle to find out the cmkadmin password. There is no output with the password like with the official docker builds. Find that the symlink.sh file sets the cmkadmin password. Check that file for what it is set to
-Get into the dev site (Check VSC ports tab to find your localhost port to access UI)


The streamlined version of my process this morning:
-Already have a WSL Ubuntu installed and working. I use it heavily for my job
-Installed Docker desktop for Windows
-Install the Remote Container plugin
    -Make sure to follow the extra step listed in the installation steps for Docker for Windows to confirm WSL connection. I had to change the Docker Desktop settings to enable it to connect to my WSL instance.
-Followed the tutorial Get started with development Containers in Visual Studio Code to make sure my VS Code and plugin were working
-Cloned the Yogibaer75 git repo to my local WSL system
-Edit the ./devcontainer/devcontainer.json and .devcontainer/DockerFile to make it easier to choose CheckMK Edition and version:

DockerFile diff:
-FROM checkmk/check-mk-free:${VARIANT}
+FROM checkmk/check-mk-${EDITION}:${VARIANT}

devcontainer.json diff:
-        "args": { "VARIANT": "2.1.0p42" }
+        "args": { "VARIANT": "2.3.0p19", "EDITION": "cloud" }

-Open non-admin PowerShell terminal, cd to the repo folder, run code .
-VSC and container start up
-Struggle to find out the cmkadmin password. There is no output with the password like with the official docker builds. Find that the symlink.sh file sets the cmkadmin password. Check that file for what it is set to
-Get into the dev site (Check VSC ports tab to find your localhost port to access UI)


I do have a question though, and this is likely my beginner Docker knowledge showing, how would I alter the container settings/parameters to have the ability to persist the site as well as add snmpwalk files to simulate devices I have to develop against? I know that I’d have to give it a new volume that would be mounted against /omd/ but don’t know how to do that with the the container starting up from VS Code. It will be a pain to re-add hosts to monitoring every day when I come to work since I shutdown my PC overnight and docker is running on my PC

I see I was a little off on my understanding. The site will presist through container reboots, so that is helpful. I thought that each time a container was stopped all changes made were lost because the COW was not saved.

I could simulate my target devices over the network instead of using CheckMK’s inbuilt var/checkmk/snmpwalks/ directory, but I’d need to get the container to build with the network of host type instead of bridge. Trying to figure that out


EDIT:
Getting host networking was easier than expected. I thought (incorrectly) that it had to be done at build time. Here is what I added to my devcontainer.json and now have confirmed working access to devices outside my docker host on the LAN:

"runArgs": [
    "--network=host"
]

As said, it was a lot simpler than I thought.

Very great way for plugin development!

Can you give me a hint on how to set the allowed line length? The .flake8 file mentions a .pylintrc, but there is none in the project. I tried putting a .pylintrc into the root of the project, but it it does not seem to have any effect.

I have nothing set - it uses automatically the 100 characters as line length for formatting the code.

The default settings should be ok for your own code. If it is free of complains also a PR should be no big task.

If i want to make a pull request, i format the code from the root of the git repo and the config files there are used by the included scripts for testing and formatting.

It’s a bit strange, it uses 100 when I open a file in the project directory.

But when I open a file with the full path inside the Checkmk instance, for debugging, it shows Pylint (>100) and Flake8 (>79) errors. Like here:

The little blue thing at the start of the line is Pylint, the red mark under organization is Flake8.

Guess I have to read the docs about how this tools work. I hoped there would be a quick way to change this setting.

Thanks,
Sven

For debugging i must look what it does on my system.